
There are a couple of things you should decide on before you frame your print.
What’s your framing budget?
How much white space do you want around your print?
Do you want to use an appropriately sized frame or a random one?
Once you have made these decisions, framing becomes fairly simple.
Professional framing
Those with a generous framing budget can just have their artwork professionally framed. Personally I love professional framing because you can easily make striking choices of frame and mat color that will enhance the look of your print and give it a unique vibe. However professional framing is fairly expensive on this continent, so most of us must look to other solutions.
Have no fear, we shall make those exciting as well!
Use affordable standard frames
I use IKEA frames, mostly Edsbruk and Knoppäng, but any other standard frames will work just as well. Framing an art print is very easy as long as you have selected the appropriate size of frame for your print. In order to ensure this, you have to know a little about frame sizing. (It should be simple but isn’t always).
A frame essentially has three sets of dimensions.
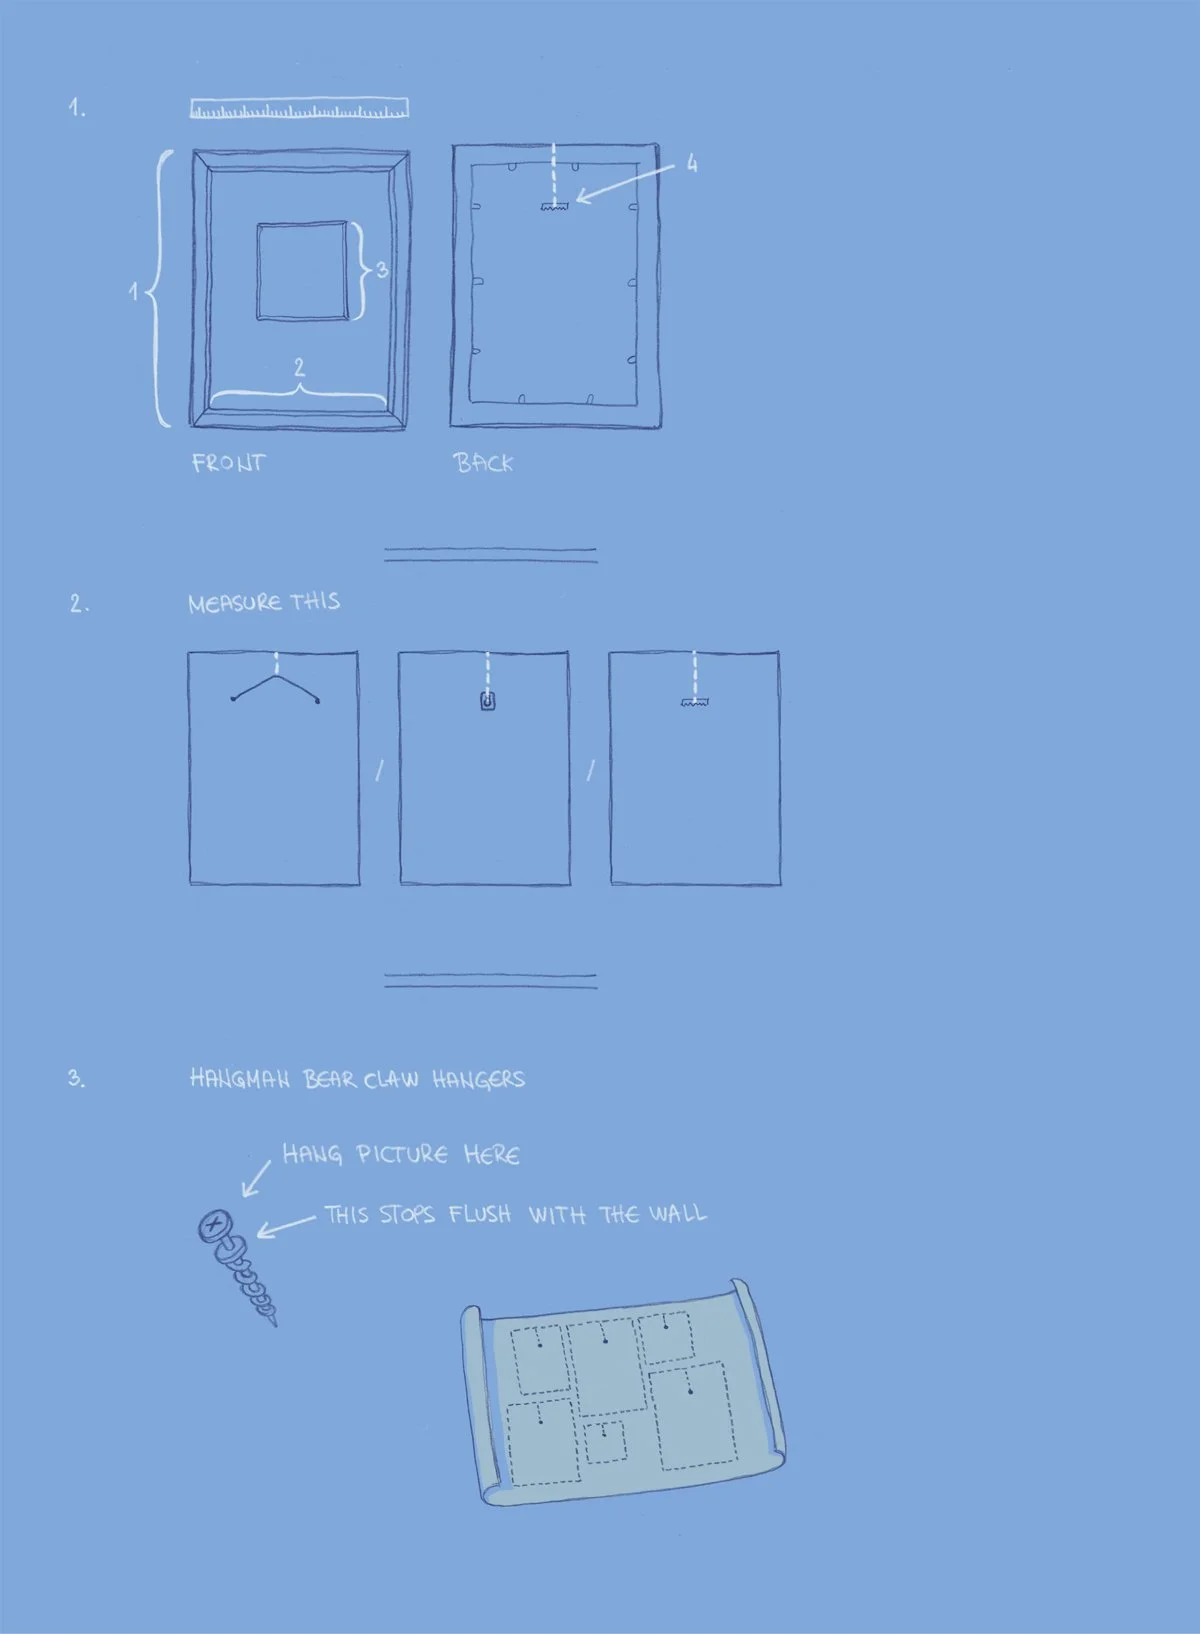
(Shown on diagram 1. on the right)
The dimensions of the outside of the frame - these are the dimensions you will use when you’re planning out how your frame will fit with others on your wall
The inside of the frame - this is the largest size of art print your frame can take. If the size of the print is the same as the size of the inside of your frame, the print will fill out the entire frame, and no mat will be showing behind it. These dimensions are usually the listed dimensions of the frame when it’s being sold - so if it is labeled as a 16x20 inch frame, it will take a 16x20 inch art print neatly, with no visible mat behind the print.
The inside of the mat window - most prints come with a stiff piece of cardboard called a mat, which is meant to give your print room to breathe in the frame. The mat window will usually be one standard size smaller than the listed frame dimensions. So a 12x16 inch frame will have a 8x10 inch mat window. If you want a 12x16 inch art print to fit inside the mat window of your frame, you have to size up the frame by one standard size, and get the 16x20 inch frame.
Both the frame and the mat window will actually overlap slightly with the very edge of your print, to make sure it looks neat and no paper edges are showing.Something that isn’t part of the formal dimensions of the frame but will be very useful for you to keep in mind is the height from the point where the nail/ screw will actually hold the frame to the top edge of the frame. This measurement will let you position your frame precisely on your wall. (Diagram 2. shows different types of hanging gear on different frames, which will affect where your frame will hang on the wall)
How should you attach your print to the wall?
If you are starting an art collection and you want to make sure it’s perfectly fitted to your wall, it’s good to put in a little bit of planning in before you start hanging things. (I did not do this, and have lived to regret it as my gallery wall grows ever more chaotic).
In terms of print hanging methods, I have a clear favorite because it is so easy to work with and requires no tools. (It only works with drywall though, so if you are in Europe and have concrete walls, you are going to have to take a drill to them, sorry). It’s called Hangman Bear Claw Hangers (Diagram 3.)
It’s a brilliantly specialized screw that has two heads - one head will lie flush with your wall, and the second one will conveniently stick out just enough for you to hang your print on. It guarantees all your prints are uniformly distanced from the wall and is pretty strong without needing a pilot hole - you can just screw it into either the drywall or the stud behind your drywall with a regular Phillips-head screwdriver.
How should you match print size with frame size?
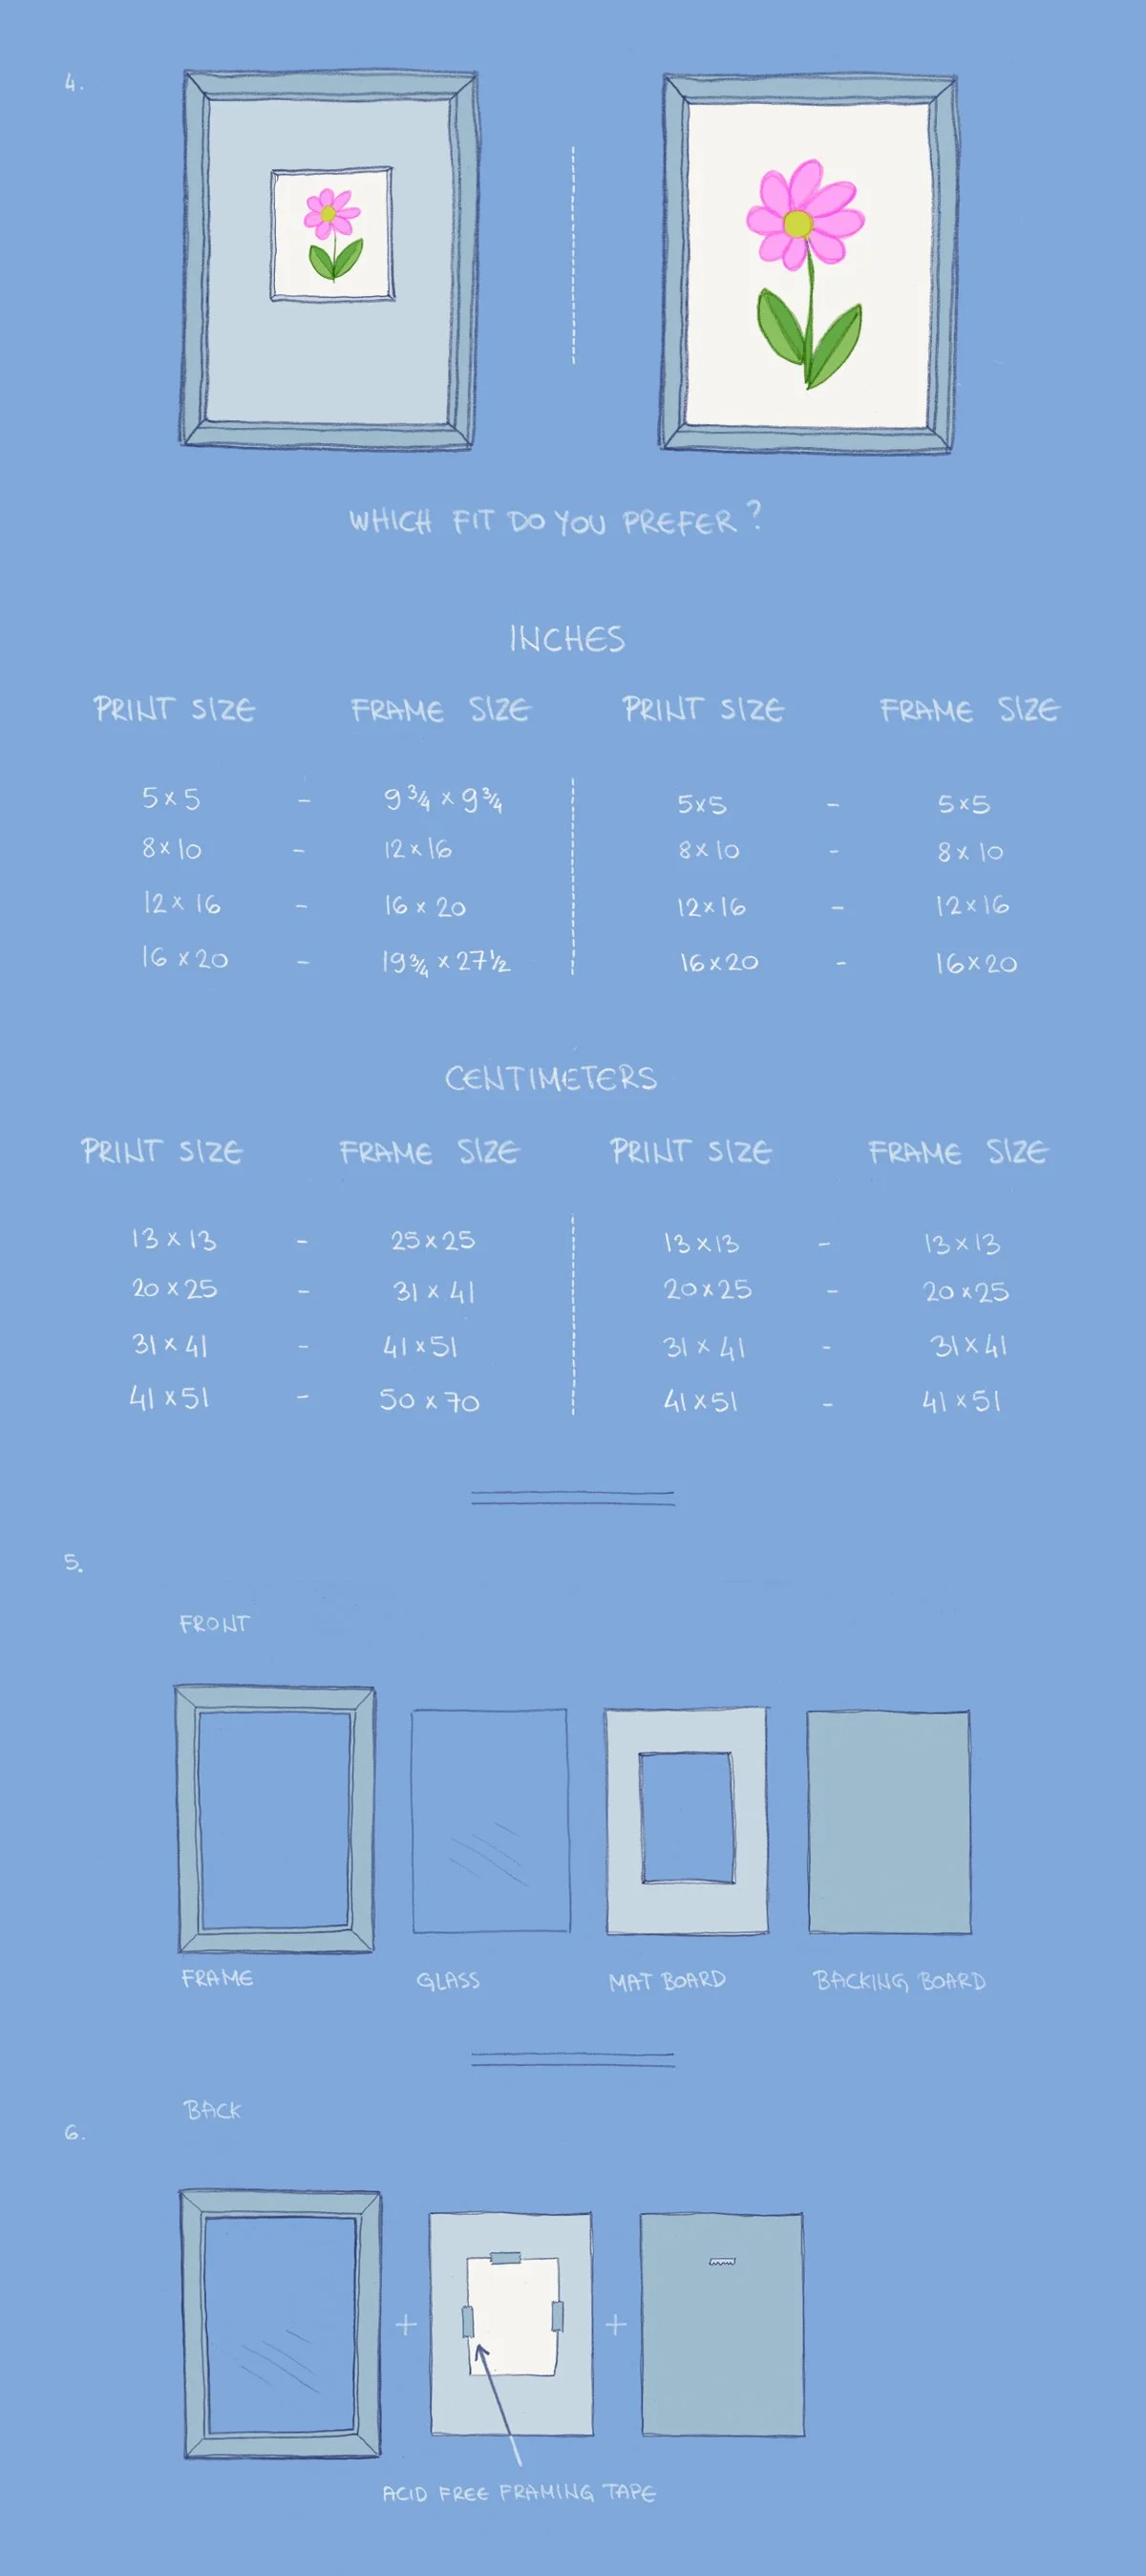
If you’re buying a custom frame for your new print, you have two options - having the frame entirely filled with the print, or the frame being one size larger than the print, so the print can fit inside the mat board window and will be surrounded by the nice clean whiteness of the mat board. This usually makes prints look a little more classy, but you are totally welcome to follow your own tastes when you’re picking your frame.
Diagram 4. gives you a quick guide for picking your frame size depending on how you want your print to look inside its frame. Personally I tend to lean towards the print being the same size as the frame if the print has a white background, and fitting the print into the mat board window if the print is full color.
How do you get your print into your frame?
When you get your new frame, you will want to lay it on its face on a clean table (don’t do this in your lap like I do) and gently lift up the little metal tabs that are holding the backing board in place. (Those are called points, by the way. It’s a weirdly unspecific name for them).
Try really hard not to smudge the inner side of the glass, because if you frame up your print and then see a smear on the inside of the glass, you will be thoroughly annoyed. Generally it’s a good idea to wash and dry your hands before doing this so you don’t leave any stains on the print or the mat.
If the frame has polymer protection instead of glass, it will probably come with protective foil on both sides, make sure you peel those off before assembling the frame (it seems really obvious but sometimes it’s hard to see it’s there).
Diagram 5. shows you the parts of a standard frame. Your art print will go on top of the mat board if it fills out the whole frame, or behind the mat board if it can fit in the mat window. The backing board presses it into the frame and pushing the points back down will secure the backing board in place.
If your print is a weird in-between size (like the 11x14 inch prints tend to be between frame sizes), or if you’re using a random rescued frame, you can put the print in front of the mat board, and attach it to the mat board so it stays in place. Put your frame on a flat surface, place the glass/ transparent sheet into the frame, then center the print carefully where you want it to sit. Then gently place the mat board on top of the print (you can also attach it to the front of the mat with a bit of framing tape to keep it in place, and then remove it when the back is properly secured), and attach the print to the mat board with acid-free framing tape, like on Diagram 6.
If your print is perfectly sized to fit inside the mat board window, then you put the print behind the mat board, center it there, and attach it to the mat board with acid-free framing tape. Check how it fits, because depending on how you place it you might be cutting off a tiny piece from a specific part of the print that you really want to show, so experiment with different positions before you commit. Framing tape is gentle and won’t damage your print.
All materials for framing should always be acid free, because over the years materials that are not acid free will yellow and turn brittle, possibly damaging your print. Framing tape isn’t expensive and you can get it at any art store, it’s a worthwhile investment because a single roll will probably last you your entire life.
Look at the front of the print and make sure everything is in place before you secure the backing board in place. And you’re done!
How should you arrange your prints on the wall?
Naturally there are countless ways to place your prints on your walls, but here are some things to consider if you’re not sure how to go about it.
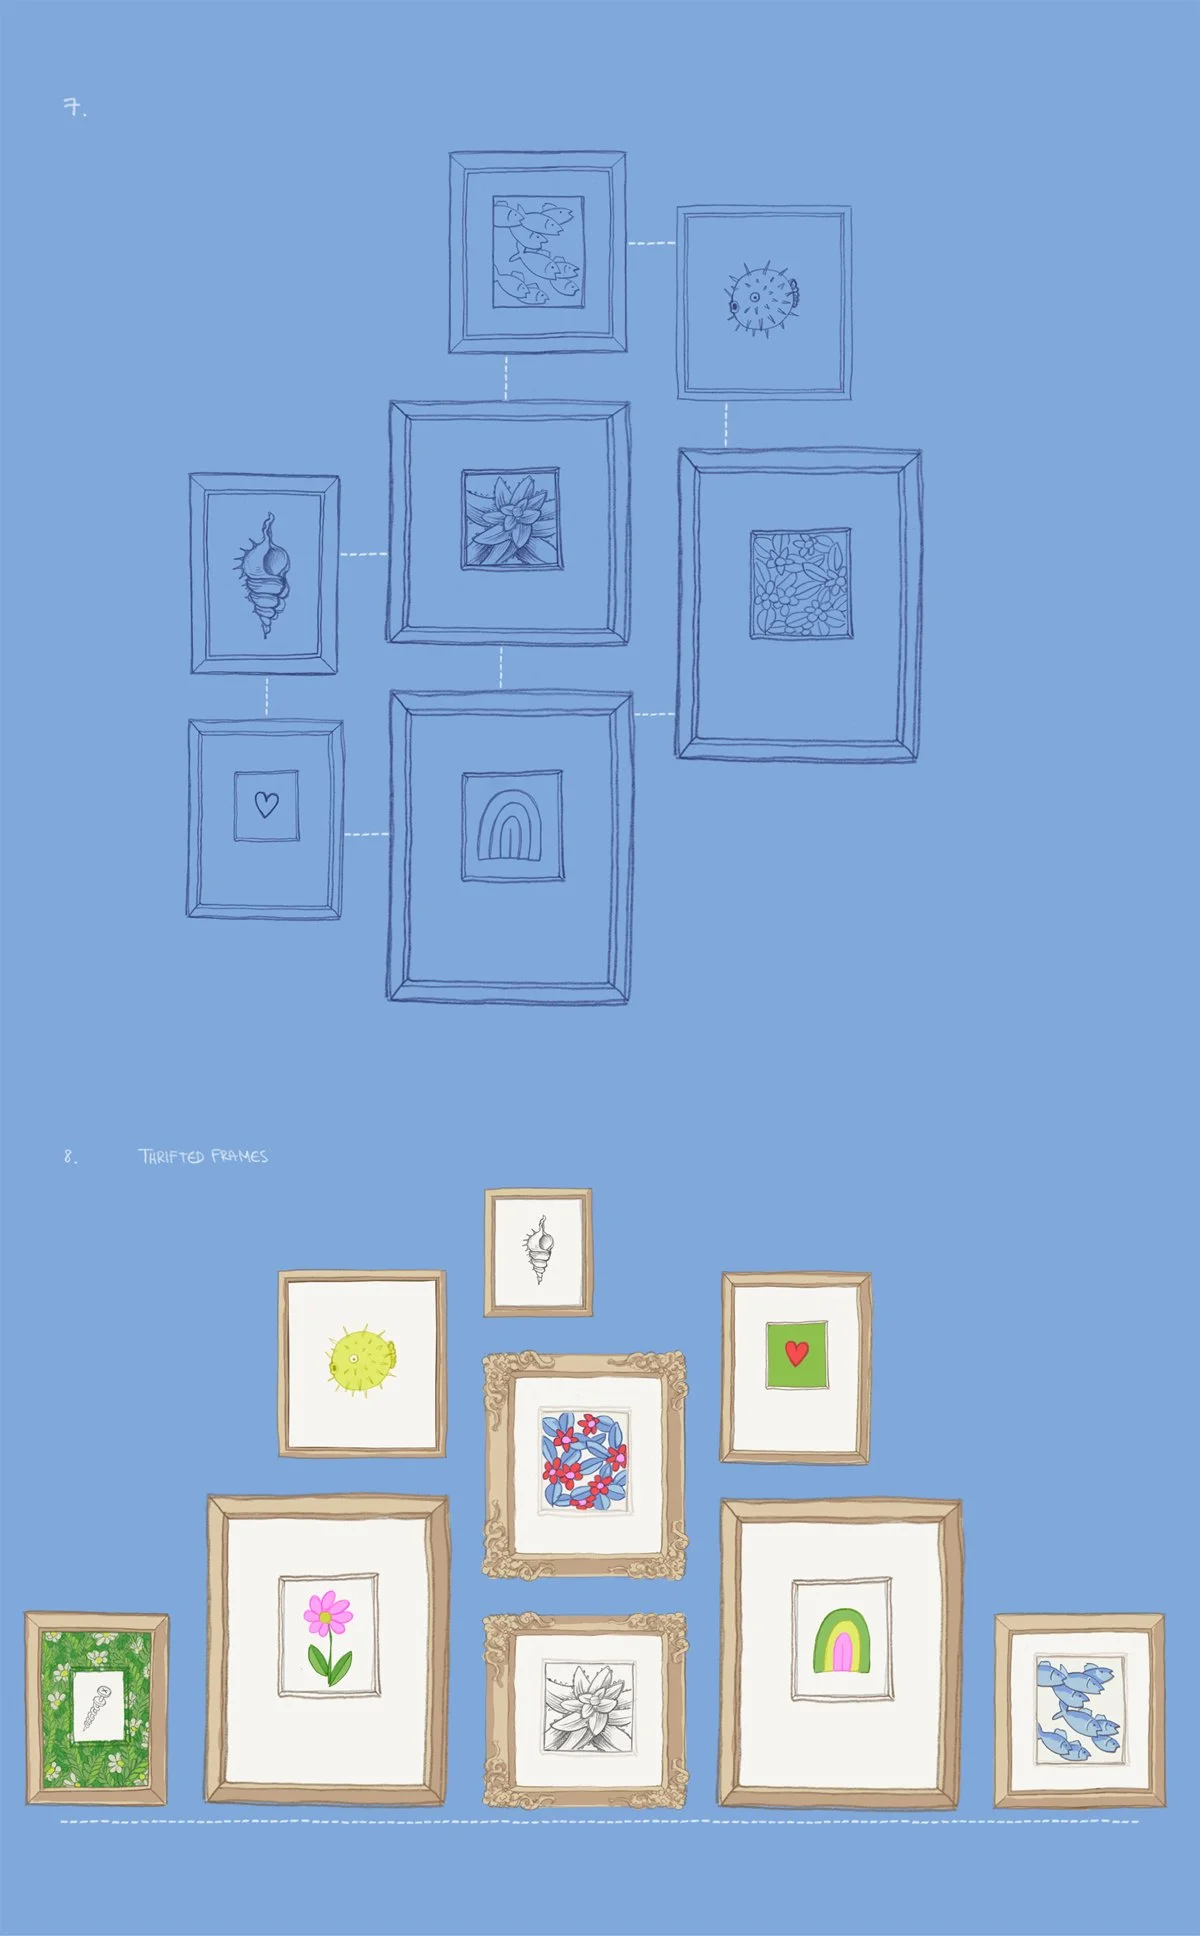
Consider how many prints you have, what sizes they are, and will you be adding more over time. A large print can sit comfortably on its own on a large blank wall, but smaller prints like to live in flocks.
You don’t have to space your prints evenly, but if you want to make sure they are evenly spaced, you will need a little bit of preparation.
The easiest way to decide how you want your prints arranged is to measure out the outside dimensions of your frames, and then cut out paper rectangles in those exact dimensions. Then you can play with those cutouts and your framing tape (framing tape should be gentle enough to not damage your wall paint, but still be careful) and try out different arrangements. You can arrange prints in relation to an imaginary line, or just place the bigger ones in the middle and then randomly place the smaller ones around them in whatever way feels good.
To avoid the most frustrating thing in the world, which is getting the screws into the wall and hanging your prints in line just to realize one of them is hanging slightly lower than the other, look at the back of your frames and for each one measure exactly where the nail will be holding the print up, and mark that on your cutouts. (Diagrams 1, 2, and 3. show this).
Once your paper cutouts look good on the wall, you’re ready to start hanging prints. One final thing to take into consideration is the balance of colors of your prints - if you have a mix of colored and black and white prints you may not want all the black and white ones on the same side, for example. Or maybe you do want that - you do you. But consider it before you make holes in your walls.
Take your Bear Claw Hangers (or whatever else you’re using to hang your pictures, but you should totally be using Bear Claws, they don’t pay me to say this, they’re just the best I have found so far) and screw them directly into that mark you made on your cutouts that marks where the frame hanging gear will be engaging with the screw. That should make sure they’re all in exactly the right place. Once they’re in, you can gently remove your paper cutouts and hang your prints.
If you are anything like me you are now in love with your gallery wall. Final thoughts - you can add an accent color to your wall, you can paint your frames, or use different colored mat boards. Arranging the prints in a non-regular way, starting with larger prints and adding smaller ones in a cloud around them, is the most flexible arrangement in terms of being able to add other prints later as your collection grows.
Now you’re ready to go back to shopping for prints!